Are you confused about applying the thermal paste on GPU & CPU? If yes, then this article is for you. Below we have shared everything you need to know about thermal paste, types of thermal paste, and how to apply it.
When building a new system, people put more attention on their processor, graphics card, and RAM, and the thermal is just of mere importance. But in actuality, these thermal pastes are one of the crucial factors in assembling your PC. A good one keeps the computer’s part functioning for a very long time.
The thermal paste may be known by many other names like thermal gel, thermal grease, or heat paste, and many more. No matter by what name you know it, the purpose remains the same. It is a chemical compound, thermally conductive, which acts as an interface between the heat sink and GPU and CPU. It eliminates air gaps or spaces and leads to an increase in heat transfer and dissipation. Remember that it is only thermally conductive but not electrically.
When building a new PC, a tube of thermal paste is of utmost significance for the system to perform smoothly. You can find some CPU heatsinks that have pre-applied thermal paste to them. So, you can install it and start your work. But many times, people wish to apply their favorite brand of thermal paste manually.
Types of Thermal Paste
There are primarily three types of thermal paste; metallic based, silicon-based, and ceramic based. The metallic-based thermal paste is most popularly used because of its high functionality. But thermal conductivity has electrical conductivity too because of the little piece of metal present in it. Next comes the ceramic-based; it has minute particles of ceramic just like metallic-based has metals present. Lastly, silicone-based thermal paste works fine but not as well as the other two.
The purpose of thermal paste is to transfer heat from the CPU away into the heat sink. From there, it is expelled from the hardware. This maintains the temperature of the CPU and keeps the CPU cool, especially when it’s hard at work processing tasks.
So now that you know what thermal paste is, the following significant thing to know is how to apply thermal paste to your CPU and GPU. We have mentioned below a complete analysis of this. So, let’s check out the methods.
Types of Thermal Paste Application

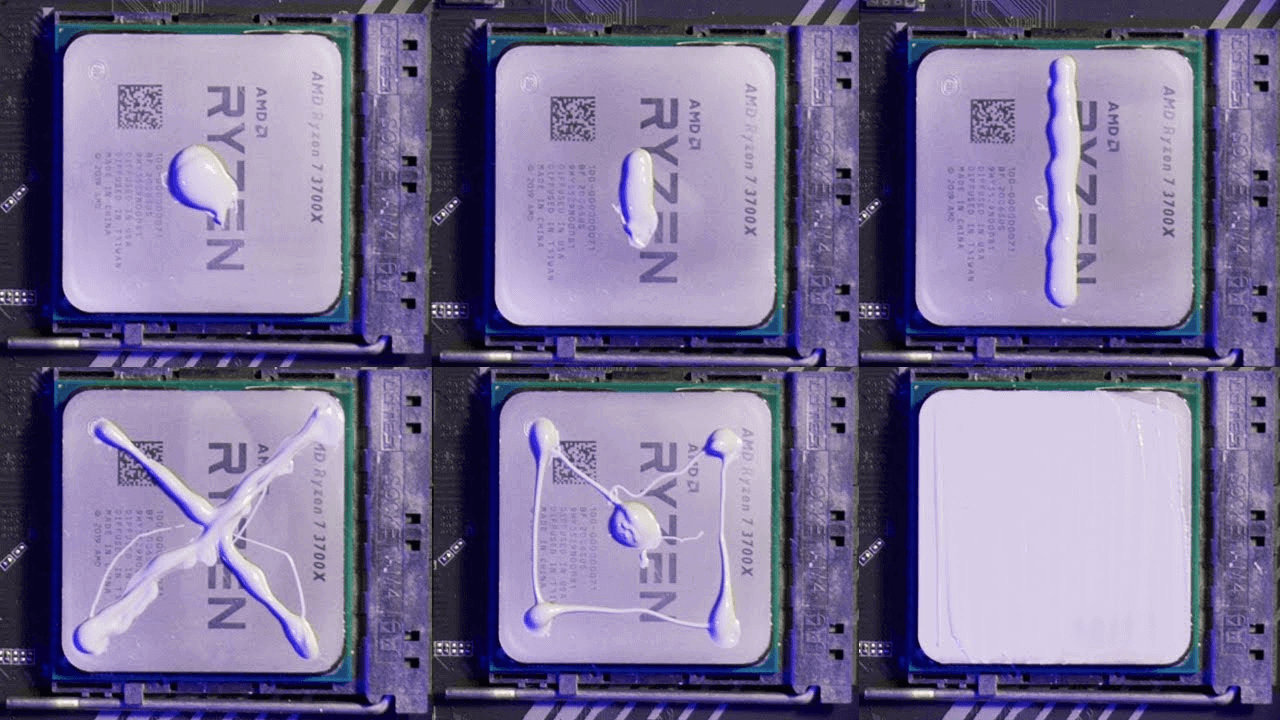
There are quite a few ways to apply the thermal paste. And almost all of these ways work just the same. So, you don’t have to worry about finding the best way to use the thermal paste. Let us take a particular case and understand how the temperature of the system is affected by it. Here we will be taking AMD Ryzen 7 3700X + Wraith Prism. So, let’s check one by one:
- By applying a pea-sized dot of thermal paste to the build, its temperature can be maintained at 62.
- If we apply it in a line, then also you can find the same result.
- When you apply the thermal paste in the cross, X way, then the temperature of the system that you can expect is 62.
- Similarly, if you apply in the spiral way or finger, you can find the exact effect that is 62.
- Lastly, if you apply too much thermal paste, you won’t find any difference, but if you use too little paste, the temperature can reach up to 69.
- So, this proves that the method you use does not make much difference. The only thing is to make sure that you do not apply too little paste that can be a problem. So, you can use the thermal paste in any of the following methods as you want.
When Do You Need to Apply Thermal Paste?
Thermal transfer material is used at the time you install any cooling solution. When building a PC, the thermal paste helps in the process of installing a CPU cooler. At the time you purchase a graphics card, the thermal solution is already applied. So, you don’t need to do anything else.
But if you want aftermarket solutions like custom liquid cooling, you need to apply the thermal paste. For a CPU cooler, you can select the one that you wish to, but for that, you’ll need to install it yourself.
Terms You Need to Know
It’s always better to have complete knowledge of the methods and the terms used to understand things better. Let’s know about all the basic terms that you need to know before applying the thermal paste;
1. Central Processing Unit (CPU)
The CPU is the brain of a personal computer. It controls and manages all operational functions and sends the instructions to the hardware of the system. It is one of the most critical parts of the computer and executes all of its functioning.
Modern CPUs work at very high speed and execute a high volume of operations every second, thus creating a lot of heat. For a CPU to function efficiently, it is essential to cool down properly and maintain a temperature. And that is why thermal paste becomes so important.
2. Integrated Heat Spreader (IHS)
The integrated heat spreader is the metal lid of the CPU. This acts as a heat sink that distributes the heat from the processor to a CPU cooler. Above all, it also protects the processor from the inside.
This part of the CPU remains exposed after being installed on a motherboard. Thus the paste is applied to this surface itself.
3. CPU Cooler
A CPU cooler keeps your CPU running at an optimum temperature. They usually use air or liquid to drive away the heat generated by the CPU when it functions.
The CPU cooler is attached exactly above the processor so that it can directly flow air on it. There are hundreds of CPU cooler manufacturers. All those coolers are almost the same. Some of them also come with RGB lighting.
4. Base-Plate
The base plate is the metal base of the air-cooler that is attached to the IHS of the CPU. The purpose of the base plate is to transfer the heat by the convection process to the heat sink. From there, the heat is redistributed with the help of a fan.
Base plate plays a significant role when it comes to keeping the computer at optimized temperature when you are doing heavy stuff like video editing or gaming.
5. Water Block
It is the component that you can find attached to the IHS when using a liquid cooler or a custom cooling loop. The purpose is to transfer the heat from the IHS to the heated fluid; from there, the heat is relocated and gets redistributed by fans to a radiator.
In simple words, it is a water cooling equivalent of the heatsink. You can say it is a type of heat exchanger. Not just on CPU, this can be used on many different computer components such as GPU, PPU, and northbridge chipset.
6. Thermal Paste
Lastly comes the thermal paste. It is a silvery-grey substance that is applied to the processor before installing a cooling solution. It helps in the effective transfer of heat from the IHS to the base plate or water block of the CPU cooler. From there, the heat is dissipated out of the system.
Those were all the essential terms necessary for you to know before you start applying the paste.
Necessary Preparations for Thermal Paste Application
Most of the processors have a pre-applied thermal paste that can directly be installed and start operating. You can check it by looking at the bottom of the base plate or water block of the CPU cooler. If you find a silver plate, then know that the paste is already applied to it. But if not, then you will need to apply it on your own, or if you wish to do this on your own, then you need to be careful and make a few crucial preparations.

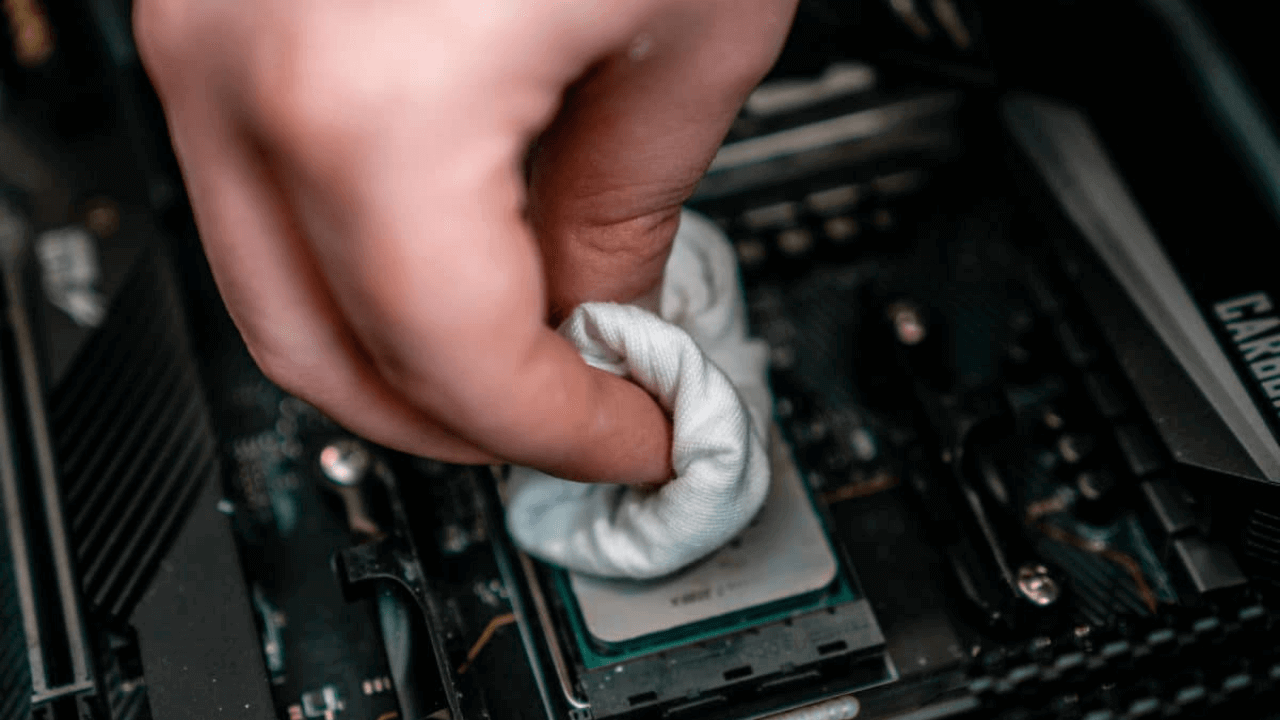
The first very vital thing to do is to make sure that your CPU is completely clean. Check for any old thermal paste or dust. If present, clean it properly with a tidy piece of microfiber cloth or paper towel. You can clean the lid of the CPU with isopropyl alcohol and. But be careful while doing so and let it dry completely before continuing.
Before you start to apply the thermal paste, you need to make sure the rest of your CPU cooler is ready to get installed. Read the instructions properly and follow every step with utmost care. Have all the necessary tools that are required to complete the process.
Situation to Avoid
The very first important point to take care of is to apply the right amount of thermal paste. Make use of a pea-sized paste. The quantity does not impact the effect of the temperature. But if you apply too little paste, then it will not be effective. It reduces the efficiency of the paste as the metal surfaces are at a far distance. Apart from all this, be careful not to risk spilling out the paste on the motherboard.
If you want to apply the paste on the CPU surface, you need to be careful. So, if you are not an expert, then have the re-applied pressure from the base plate or water block do it for you. Any error in Il application can lead to air bubbles forming in the paste, causing a drastic impact on thermal conductivity.
The reuse of the paste leads to the formation of air bubbles. Any issue during the installation can make you remove the CPU cooler. Completely clean the old paste as we have already told above. After cleaning the paste, try to re-apply the paste carefully. If you are in immediate need of applying the paste, you can reuse it, but it should be temporary. And use the proper reapplication for long-term use once you have the replacement paste.
Applying the Thermal Paste to a New CPU or GPU
Applying the right amount of thermal paste correctly is vital. If you are trying for the first time to apply thermal paste, it is obvious that you might be nervous. But don’t worry; we have a detailed guide for you to proceed without making any errors.
There can be two major reasons why you’ll need to apply the thermal paste. Firstly, you may have bought a new chip, or you are replacing the old thermal paste. What happens is sometimes you unknowingly buy the hardware that does not have the thermal paste, and you would have to apply it on your own. Not everyone knows how to do it.
So let us know how to apply the thermal paste on the CPU and GPU.
1. Getting the Right Paste
Of course, the first important step would be to choose the right paste. The more expensive thermal paste is better and performs more effectively. But as always, there are some exceptions to this. High-quality thermal paste allows the better conductivity of heat from the CPU to the sink. But the cheaper one can also perform the function excellently.
The thermal paste is not that expensive, so buying a branded and high-quality paste won’t be too much for you. But remember that this will not make much difference. The next important thing is that the thermal paste generally comes in a tube-like container, just like a medical syringe. It allows the easy and controlled application of the paste. So, you can precisely squeeze the right amount of paste to use.
2. Installing the Chip
Before applying the paste, the vital thing that you will need to do is to install the chips on the motherboard and completely secure it. The thermal paste is applied on the top to conduct heat to the heatsink.
If you are attaching your CPU to an older motherboard, you will have to detach it completely by unscrewing the screws or detaching the sockets. For this, carefully follow the instructions provided by your motherboard manual. Be attentive and careful to avoid any mishap or damage.
Once you are done doing this, gently hold the pin from both sides. It is done not to damage the chip. You can find a small triangle, which is an indicator, it helps you align the CPU with the motherboard’s socket precisely. And then secure the chip with the help of latches and screws.
3. Installing the Chip
The next thing is to put the heatsink in the system. Remember that the thermal paste is not an adhesive so that it won’t hold the heatsink. Before placing the chip, apply the paste very carefully.
As talked about earlier, there are different ways to apply, but the best ones are the ‘Dot’ and ‘Cross’ methods.
A. Dot
In this method, we apply a thermal paste the size of the pea-sized in the middle of the CPU. Gently palace the heatsink firmly but not with full-body force.
Remember not to slam it; adjust it from all sides. Try to keep the thermal paste of the size of the capacitor around the CPU. It is an easy and safe way to apply as this eliminates the risk of spilling the paste.
B. Cross
To be more precise, follow this step. In this method, you will have to apply the thermal paste by making the cross sign, X; from one corner, make a straight line to the opposite corner. And repeat the step for the other two corners.
Try to stay inside the CPU border to avoid spillage. Once applied, lower the heatsink properly. And that is all you will need to do.
How Often Should You Replace Thermal Paste?
There can be many reasons why you need to change the thermal paste of your GPU or CPU.
In case you notice that components are overheating, then the first thing to do is to clean the GPU fan. If the over cheating does not stop, then you will need to change the thermal paste.
In most cases, there is no need to re-applying the thermal paste more than once in a few years. But if you face overheating issues, then you should replace the thermal paste. While applying the paste, be careful and follow the necessary steps.
Final Words
Thermal paste is an important component to drive away from the heat from the system and maintain an average temperature. Many PCs build pre-applied thermal paste. But this is not the case every time. Some even prefer to do this on their own. While many times you need to re-apply the paste. So, in all these cases, you will need to apply the thermal paste on the CPU and GPU on your own.
You make use of different methods to apply the paste but know that they all work equally fine. Just remember not to apply too little and avoid spilling the paste on the motherboard. This article is a complete guide on how to apply the thermal paste.
After reading it, you can easily perform this overwhelming task on your own. Just follow the instructions carefully, and you will be good to go. Now that you know how to do it, why don’t you try it? And let us know in the comment section below how helpful this article was for you.

