Are you thinking of increasing dedicated VRAM in your Windows computer? If yes, then this article is for you. This article has explained everything you need to know about VRAM, types of VRAM, and ways to increase VRAM in Windows.
For immediate access to any application or program, computer memory has a significant role. The RAM (Random Access Memory) is the computer memory that stores all the data of the system processor. You can find it on the motherboard for quick access to the files. When you execute any file from the hard disk, it is first loaded on the RAM.
But what happens is that sometimes we need to play some high-quality video or high graphics games. They are processed quite differently, and that is when VRAM or Video RAM comes to the rescue.
What is Dedicated VRAM?
The graphics-based programs need ample space in the system’s memory for generating high-quality video with complete clarity and definition. Your RAM may not have enough space and thus fails to buffer the high graphics-intensive video.
The system works smoothly with RAM unless you have to run high-end video. But in case you need to buffer the high-quality visual video, you will need a particular type of memory known as Video RAM (VRAM). VRAM is distinct from regular RAM in the way that it works. It operates with a graphics card to provide high-quality videos and animations. The primary purpose of VRAM is to create and transmit favorable data to the graphics card to ensure reasonable output.
The graphic card makes use of VRAM to store the images and video data. It is also known as virtual RAM. Nowadays, many games call for 1080p to 4k resolutions, and your VRAM may fall short. For higher resolution, VRAM processes more pixels. If you have a shortage of the required video memory, the whole load will fall on the GPU.
Every VRAM is a unique configuration of dynamic RAM (DRAM). It is a buffer between the processor and the system’s display and therefore also termed as the frame buffer. When high-quality images are sent to the display, they, first, reach the processor in the form of data for reading. And after that is written to VRAM.
Now from VRAM, the data goes to the high-definition multimedia interface (HDMI). The transfer is done via a digital video interface or video port in the form of a digital signal. This signal falls onto a modern flat-screen LED (light-emitting diode) display. If the display is associated with a former VGA (video graphics array), then the signals need first to be converted by RAM into analog signals that are transmitted to the display.
Why Do You Need VRAM?
We have already discussed what VRAM is. Now let us know why it is vital to have a VRAM.
VRAM is also known as Video RAM, is necessary to run high-quality videos, animation, and graphical games. The video-oriented programs cannot be run by the RAM as they require a lot of resources. So, to run all these types of applications and programs, you will need VRAM.
The high-resolution games will not run on your system unless you have a VRAM. Sometimes they may fall short, and therefore it becomes crucial to increase the dedicated video RAM.
VRAM is necessary for the smooth performance of gaming. It allows shortening load times and image quality improvement. A sufficient amount of VRAM is required to generate a high-quality image successfully. If not, then the textures and images overload the VRAM will not be of high quality and it results in the graphics processing unit (GPU) streaming all the data onto the RAM and hence causing a decline in the performance.
The basic types of VRAM that are available for your use are:
1. Multibank DRAM
It is an outstanding RAM generated by MoSys. It allocates the memory into numerous 32 kilobytes (KB) bits, or banks, to allow the memory to control each of them individually.
The typical VRAM is monolithic, in which the entire frame buffer is controlled at a particular time. Individual memory access boosts the overall performance. Moreover, MDRAM is less costly than others as it can be manufactured with sufficient RAM for a particular resolution capability.
2. Rambus Drum
As the name suggests, this VRAM was developed by Rambus. It involves the proprietary bus that increases the speed of the data flow VRAM to frame buffer.
3. Synchronous Graphics RAM (SGRAM)
It is a unique kind of clock-synchronized DRAM. SGRAM costs less than other typical VRAM. It is a single-ported memory. But it can open up two memory pages at the same time and behaves like dual-ported memory.
4. Window RAM (WRAM)
WRAM is one of the most high-performance VRAM. It is dual-ported and has a bandwidth of nearly 25% more than VRAM. Despite that, it costs less. Its features make it a great video memory by reading data more effectively. It is used for an increased resolution of 1,600 x 1,200 pixels using all the actual colors. WRAM is in no way related to Microsoft Windows.
How to Check Your VRAM In Windows 10?
Before jumping on ways to increase the VRAM, it is vital to know how much you have in your system at present. Luckily, we know some easiest and straightforward processes for Windows 10 users.
The primary and functioning methods are as follow:
1. Through Display Setting
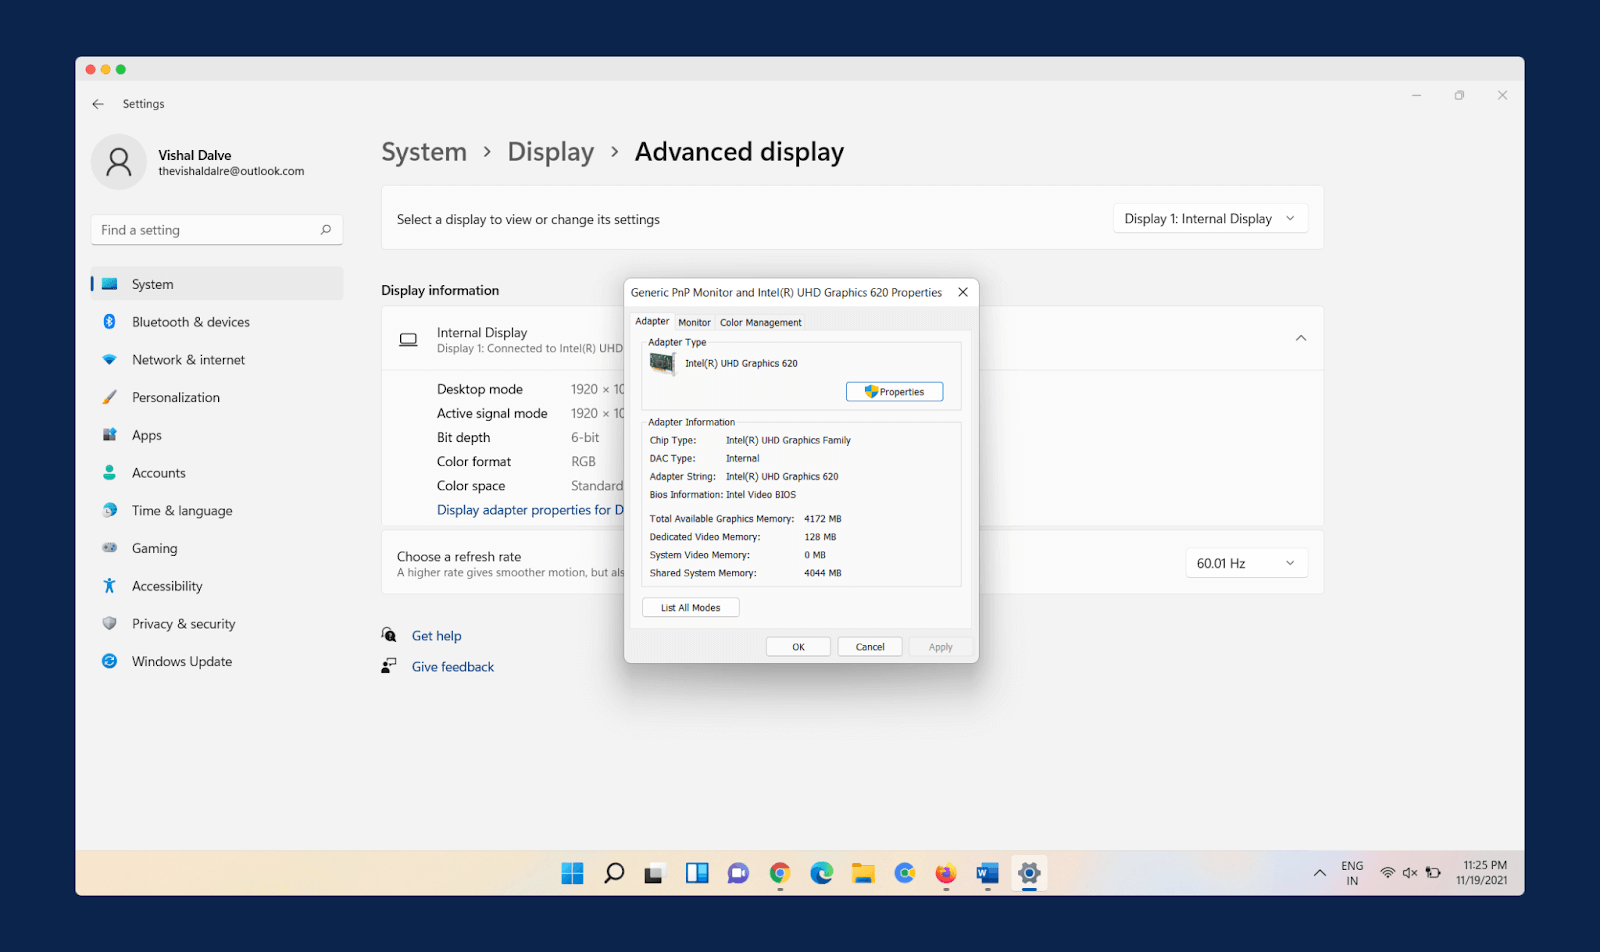
To check the VRAM of your Windows computer. First, you need to open the start menu. For that, either you can press the Windows key present on your keyboard, or you will find the Windows icon at the bottom corner of your desktop.
Then by using the search bar, search for ‘Settings.’ Open the Settings and then go to ‘System‘. In the system tab, you will find the option of ‘Advanced Display Settings,’ click on it. In the new windows, you will find the option as ‘Display Adapter Proprieties,’ open it.

Here you will get all the details of your graphics memory.
2. Using CPU-Z
For this method, download the CPU-Z, third-party software that suits your computer the best, then launch it and run it. Wait for a few seconds while the CPU-Z interprets your graphic card. Look under the ‘Graphic‘ tab, and you will find the amount of VRAM.
CPU-Z is entirely free software. You can download it from their official website; click here to visit.
3. Using Dxdiag Tool
Another way to check the VRAM of your system is by using the ‘dxdiag‘ tool; this will be the best way to check the VRAM if you have two graphics cards of your system.
You can open the ‘dxdiag‘ using ‘Run‘ windows. Press Ctrl + R to open the Run program on your Windows computer, type ‘dxdiag‘, and click on Ok,
Then your windows will ask you to connect to the internet. Click on Yes to grant the permission.
When you do so, the DirectX Diagnostic Tool pops up; from there, click on the Display option, and you will receive all the information about how much VRAM your system has.
How to Allocate More VRAM in Windows 10?
So now that we know all about VRAM and the method to check it, the very next thing is to increase the VRAM in your Windows 10. We have three possible ways that work smoothly and most effectively.
Let’s check all of them one by one;
1. Increase Dedicated VRAM Via BIOS
The very first method is by BIOS. But before that, it is necessary to check the amount of VRAM you have at present. For that, follow any one of the mentioned steps above. Now to increase the VRAM, restart your system.
Now, wait for the first start-up screen to display. As it appears, enter BIOS and keep pressing any of the keys- F2, F5, F8, or Del. It is advised to start pressing the key the minute you restart the computer. When you press the BIOS key, the BIOS menu will load up.
Once the window opens on your screen, look for an option similar to Advanced Option/ Chipset. Then on the next screen, look for something similar to VGA Share Memory Size, Graphics Settings, Video Settings.
Now the last step is to choose the option Pre-Allocated VRAM and change the amount as per your desire and at the same time that is suitable for your system. After doing all this, save the changes and restart your system.
2. Increase Dedicated VRAM Via Registry Editor (Integrated Intel GPUs)
The next step to increase the VRAM in your system is through the registry. It is quite a complicated method, and any error can even damage your Windows. We have a detailed explanation of the procedure below.
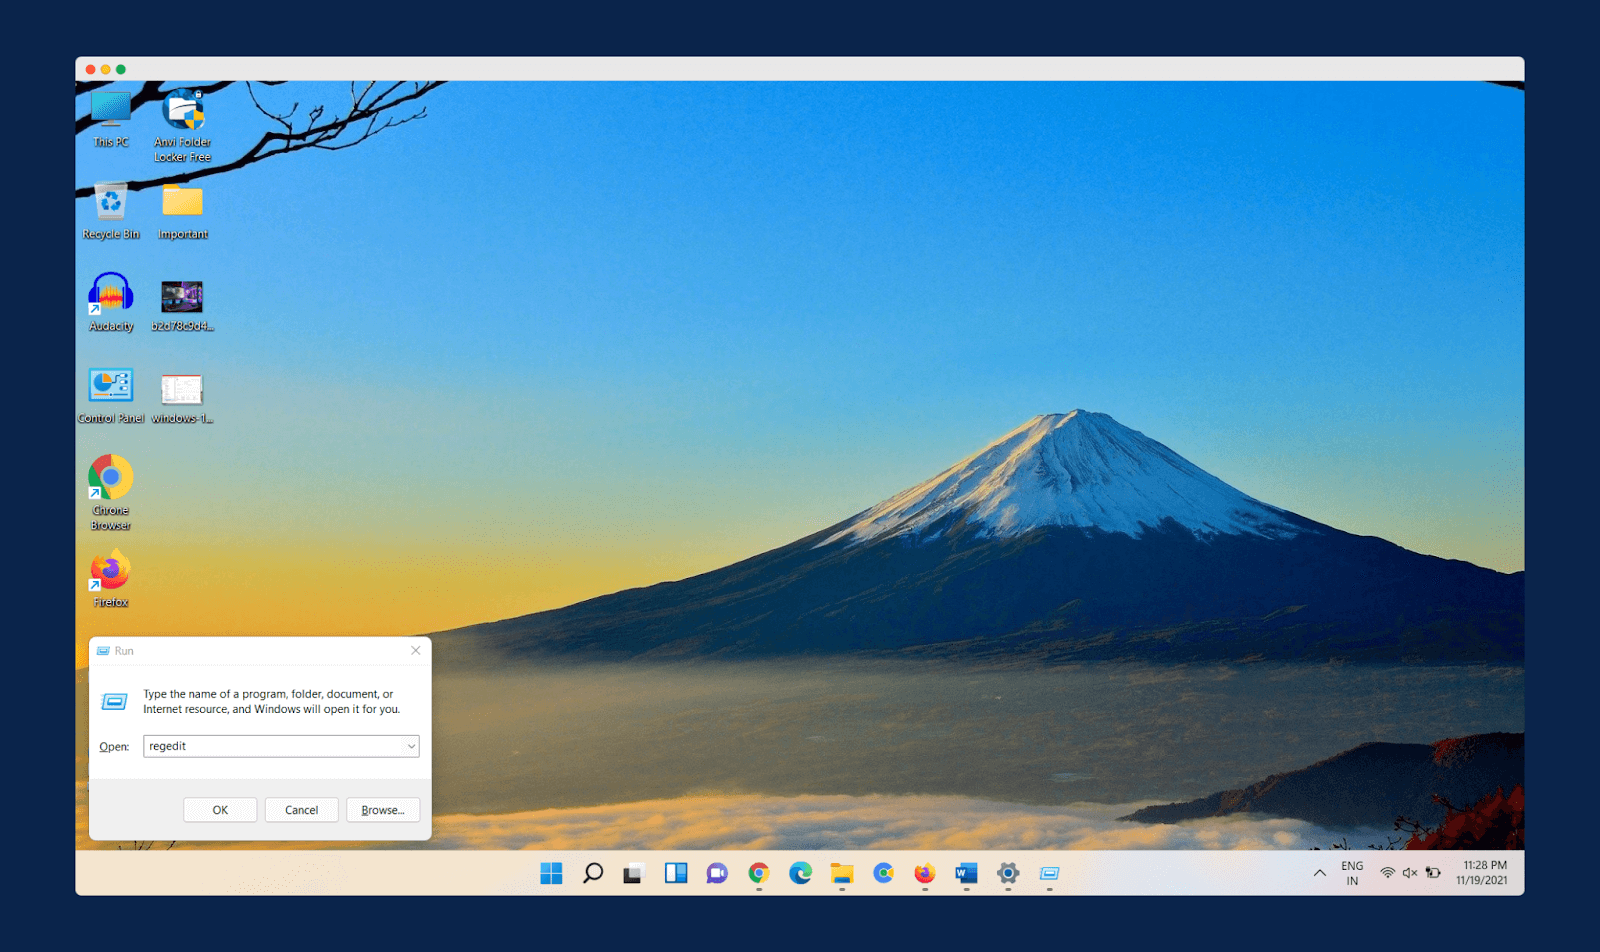
To start with the process, you first need to open the Run program. You can open the Run program by pressing Windows Key + R. Then, in the Run program, type Regedit and press Enter, the registry editor of Windows will open.

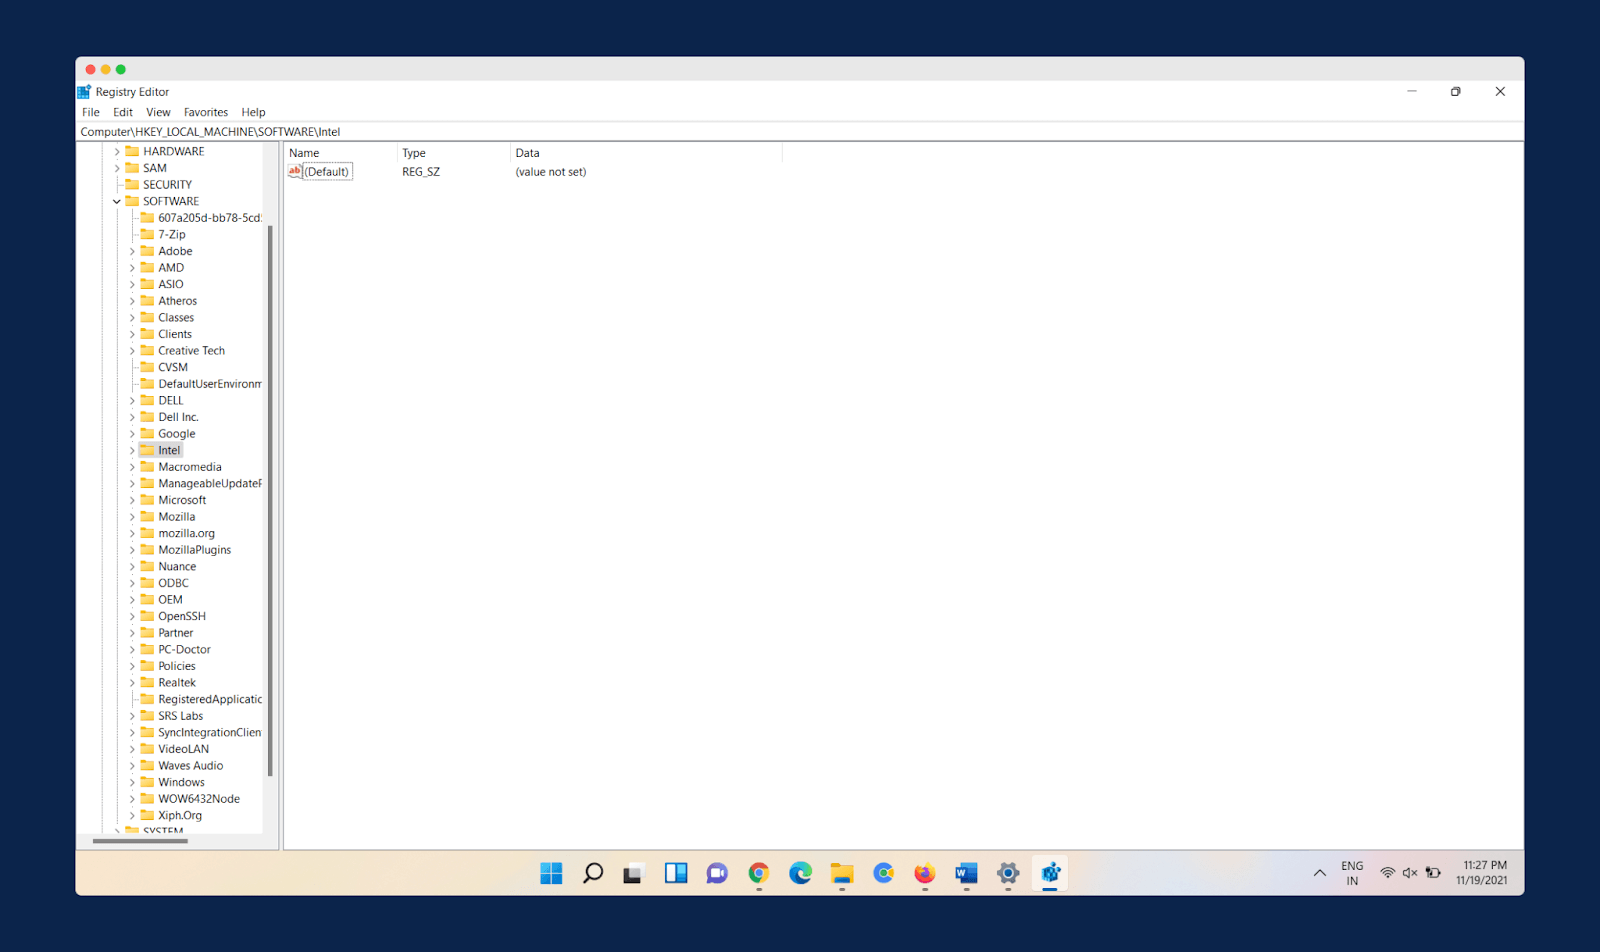
The very next thing that you have to do is, if your system has Intel onboard graphics, then you have to look for HKEY_LOCAL_MACHINE\Software\Intel. If you have an AMD APU, you can change the last option, Intel, to AMD.

On the left side of the panel, you have to right-click on the ‘Intel‘ folder and then choose New > Key and name it GMM. When you do it on the left side under the Intel, a new folder will be formed named GMM. Again right-click on it and generate New-Dword and name this folder as DedicatedSegmentSize.
The next step is to double-click the folder and look for the Base option. Under this, choose the Decimal. The last thing that you will have to do is to enter the value between 0 to 512 under the Value Data option. That’s it; now you can save these changes and then restart your system and enjoy high-resolution games.
3. Upgrade to a Dedicated GPU
As said earlier, increasing the VRAM with a registry method can be too risky, and therefore not many will be eager to follow it. So, for them, we have another way with which they can quickly increase their VRAM. It is simply to buy upgraded graphics cards.
They come with significant horsepower. Purchasing an upgraded one means allowing better quality video and high-resolutions games to run on your computer smoothly.
Even an old upgraded GPU will work more effectively and efficiently than an integrated one. They have a high amount of VRAM and computing power. For regular work, you can rely on an integrated GPU, but it won’t work well with high-definition images and textures.
The dedicated GPU is hardware with its memory, infers that use their RAM to process or control your graphic performance. They are best for hardcore gamers or for those who render heavy works.
Frequently Asked Questions (FAQs)
If you have read the above article completely, then maybe all your doubts have already cleared, but still, if you have some questions below, we have answered some frequently asked questions by our readers. Do check it out.
1. Can VRAM Be Increased With RAM?
Just above, we have described all the possible ways in which you can increase your VRAM.
Well, there is no specific way in which you can increase the VRAM with RAM. The only thing you can do is to use more of your RAM as VRAM. You can change the amount of memory shared through BIOS or REGEDIT. If you have an in-built graphic card, this method works, but for the dedicated graphic card, it is not applicable.
You can increase the VRAM of your system by registry method, BIOS, or simply by buying a dedicated graphics card. We have explained all these steps above.
2. Is 128 MB VRAM Good?
The 128 MB VRAM used to be good, but now it has become just the minimum VRAM. 512 MB VRAM is best for playing high-resolution games. With 128 MB VRAM, you can play games like GTA SAN Andreas, NFS, and FIFA 07, but most probably not any recent high-demanding games.
You can always increase the 128 MB VRAM with the methods mentioned above in the article. Buying a dedicated GPU is one of the best options to do it.
3. Is It Bad To Increase Dedicated Video RAM?
No, it is not bad to increase the VRAM. It provides you with better quality and high-resolution games and Videos.
The only thing to remember is to be careful about increasing the VRAM, especially the registry method. Any error can lead to complete damage to your system.
4. How Do I Fix Dedicated Video Memory?
To fix the issue with dedicated video memory, download the Restore PC repair tool. It resolves all the basic errors and protects your system from any file damage or loss.
Download the tool and then launch it; you can find an option, ‘Start Scan’ to find the issue with your graphic card. Once it is detected, click on ‘Repair All’ And all the problems will be resolved immediately.
Final Word
Computer memory is one of the essential parts of the system. VRAM (Video RAM) or Virtual RAM belong to this critical component. It is needed to run high-end videos and games on your system.
The insufficiency in the VRAM can lead to an overload of RAM or lousy performance of the system. That is why it becomes essential to increase the amount of VRAM of your system. Before doing that, the very first thing you will have to do is check how much VRAM you have now. Once you have done that, there are three possible ways to boost the video memory of the system.
The very first method that we described in our article is through BIOS. It is a quick and straightforward method that works effectively. Then comes the second method that is via registry editor. This step, as told earlier, is too complicated and therefore it is advised less. The last and best method is to buy dedicated graphics. It works the best.
So now we all know about the VRAM; why don’t you go and try to increase the video memory of your system and enjoy the outstanding clear quality games. We hope this article about increasing dedicated video RAM (VRAM) in Windows 10 is helpful to you. Do share this content on social media if you find it helpful for you in any manner.

